Linux杂记
ifconfig
ifconfig是我们最常用的查看当前系统的网卡和 ip 地址信息的命令。如果你的机器上还没安装 ifconfig 命令,可以使用如下命令安装:
sudo apt install net-tools
安装成功以后,我们就可以使用ifconfig查看机器网卡信息了:
[root@localhost ~]# ifconfig
ens33: flags=4163<UP,BROADCAST,RUNNING,MULTICAST>  mtu 1500
        inet 192.168.206.140  netmask 255.255.255.0  broadcast 192.168.206.255
        inet6 fe80::1599:dcc4:b3e8:7fce  prefixlen 64  scopeid 0x20<link>
        ether 00:0c:29:ee:01:80  txqueuelen 1000  (Ethernet)
        RX packets 1005  bytes 77224 (75.4 KiB)
        RX errors 0  dropped 0  overruns 0  frame 0
        TX packets 349  bytes 47206 (46.0 KiB)
        TX errors 0  dropped 0 overruns 0  carrier 0  collisions 0

lo: flags=73<UP,LOOPBACK,RUNNING>  mtu 65536
        inet 127.0.0.1  netmask 255.0.0.0
        inet6 ::1  prefixlen 128  scopeid 0x10<host>
        loop  txqueuelen 1000  (Local Loopback)
        RX packets 4  bytes 352 (352.0 B)
        RX errors 0  dropped 0  overruns 0  frame 0
        TX packets 4  bytes 352 (352.0 B)
        TX errors 0  dropped 0 overruns 0  carrier 0  collisions 0
上述输出显示了机器当前激活的每个网卡(网络设备)的 ipv4、ipv6 地址、子网掩码、广播地址等信息,这里一共两个网卡,分别是ens33和lo。
我们可以使用-s选项显示网卡信息的精简列表:
[root@localhost ~]# ifconfig -s
Iface      MTU    RX-OK RX-ERR RX-DRP RX-OVR    TX-OK TX-ERR TX-DRP TX-OVR Flg
ens33            1500     1086      0      0 0           379      0      0      0 BMRU
lo              65536        4      0      0 0             4      0      0      0 LRU
默认情况下,ifconfig命令只会显示激活的网卡信息,如果要显示所有的(包括未激活)的网卡,我们可以使用-a参数。
如果我们想激活或者禁用某个网卡,可以使用 ifconfig up 和 ifconfig down 命令,用法如下:
ifconfig 网卡名 up
ifconfig 网卡名 down
我们来演示一下:
[root@localhost ~]# ifconfig
ens33: flags=4163<UP,BROADCAST,RUNNING,MULTICAST>  mtu 1500
        inet 192.168.206.140  netmask 255.255.255.0  broadcast 192.168.206.255
        inet6 fe80::1599:dcc4:b3e8:7fce  prefixlen 64  scopeid 0x20<link>
        ether 00:0c:29:ee:01:80  txqueuelen 1000  (Ethernet)
        RX packets 1398  bytes 114269 (111.5 KiB)
        RX errors 0  dropped 0  overruns 0  frame 0
        TX packets 601  bytes 97657 (95.3 KiB)
        TX errors 0  dropped 0 overruns 0  carrier 0  collisions 0

lo: flags=73<UP,LOOPBACK,RUNNING>  mtu 65536
        inet 127.0.0.1  netmask 255.0.0.0
        inet6 ::1  prefixlen 128  scopeid 0x10<host>
        loop  txqueuelen 1000  (Local Loopback)
        RX packets 12  bytes 1056 (1.0 KiB)
        RX errors 0  dropped 0  overruns 0  frame 0
        TX packets 12  bytes 1056 (1.0 KiB)
        TX errors 0  dropped 0 overruns 0  carrier 0  collisions 0

## 禁用网卡 lo 后默认只能看到一个网卡信息
[root@localhost ~]# ifconfig lo down
[root@localhost ~]# ifconfig
ens33: flags=4163<UP,BROADCAST,RUNNING,MULTICAST>  mtu 1500
        inet 192.168.206.140  netmask 255.255.255.0  broadcast 192.168.206.255
        inet6 fe80::1599:dcc4:b3e8:7fce  prefixlen 64  scopeid 0x20<link>
        ether 00:0c:29:ee:01:80  txqueuelen 1000  (Ethernet)
        RX packets 1510  bytes 123232 (120.3 KiB)
        RX errors 0  dropped 0  overruns 0  frame 0
        TX packets 657  bytes 104751 (102.2 KiB)
        TX errors 0  dropped 0 overruns 0  carrier 0  collisions 0

[root@localhost ~]# ifconfig -a
ens33: flags=4163<UP,BROADCAST,RUNNING,MULTICAST>  mtu 1500
        inet 192.168.206.140  netmask 255.255.255.0  broadcast 192.168.206.255
        inet6 fe80::1599:dcc4:b3e8:7fce  prefixlen 64  scopeid 0x20<link>
        ether 00:0c:29:ee:01:80  txqueuelen 1000  (Ethernet)
        RX packets 1543  bytes 125948 (122.9 KiB)
        RX errors 0  dropped 0  overruns 0  frame 0
        TX packets 675  bytes 107251 (104.7 KiB)
        TX errors 0  dropped 0 overruns 0  carrier 0  collisions 0

lo: flags=8<LOOPBACK>  mtu 65536
        inet 127.0.0.1  netmask 255.0.0.0
        loop  txqueuelen 1000  (Local Loopback)
        RX packets 12  bytes 1056 (1.0 KiB)
        RX errors 0  dropped 0  overruns 0  frame 0
        TX packets 12  bytes 1056 (1.0 KiB)
        TX errors 0  dropped 0 overruns 0  carrier 0  collisions 0
## 再次启用网卡 lo
[root@localhost ~]# ifconfig lo up
[root@localhost ~]# ifconfig
ens33: flags=4163<UP,BROADCAST,RUNNING,MULTICAST>  mtu 1500
        inet 192.168.206.140  netmask 255.255.255.0  broadcast 192.168.206.255
        inet6 fe80::1599:dcc4:b3e8:7fce  prefixlen 64  scopeid 0x20<link>
        ether 00:0c:29:ee:01:80  txqueuelen 1000  (Ethernet)
        RX packets 1615  bytes 131924 (128.8 KiB)
        RX errors 0  dropped 0  overruns 0  frame 0
        TX packets 715  bytes 112423 (109.7 KiB)
        TX errors 0  dropped 0 overruns 0  carrier 0  collisions 0

lo: flags=73<UP,LOOPBACK,RUNNING>  mtu 65536
        inet 127.0.0.1  netmask 255.0.0.0
        inet6 ::1  prefixlen 128  scopeid 0x10<host>
        loop  txqueuelen 1000  (Local Loopback)
        RX packets 12  bytes 1056 (1.0 KiB)
        RX errors 0  dropped 0  overruns 0  frame 0
        TX packets 12  bytes 1056 (1.0 KiB)
        TX errors 0  dropped 0 overruns 0  carrier 0  collisions 0
ifconfig 还可以将一个 ip 地址绑定到某个网卡上,或将一个 ip 从某个网卡上解绑,使用如下命令:
ifconfig 网卡名 add ip地址
ifconfig 网卡名 del ip地址
演示如下:
[root@localhost ~]# ifconfig
ens33: flags=4163<UP,BROADCAST,RUNNING,MULTICAST>  mtu 1500
        inet 192.168.206.140  netmask 255.255.255.0  broadcast 192.168.206.255
        inet6 fe80::1599:dcc4:b3e8:7fce  prefixlen 64  scopeid 0x20<link>
        ether 00:0c:29:ee:01:80  txqueuelen 1000  (Ethernet)
        RX packets 1615  bytes 131924 (128.8 KiB)
        RX errors 0  dropped 0  overruns 0  frame 0
        TX packets 715  bytes 112423 (109.7 KiB)
        TX errors 0  dropped 0 overruns 0  carrier 0  collisions 0

lo: flags=73<UP,LOOPBACK,RUNNING>  mtu 65536
        inet 127.0.0.1  netmask 255.0.0.0
        inet6 ::1  prefixlen 128  scopeid 0x10<host>
        loop  txqueuelen 1000  (Local Loopback)
        RX packets 12  bytes 1056 (1.0 KiB)
        RX errors 0  dropped 0  overruns 0  frame 0
        TX packets 12  bytes 1056 (1.0 KiB)
        TX errors 0  dropped 0 overruns 0  carrier 0  collisions 0

[root@localhost ~]# ifconfig ens33 add 192.168.206.150
[root@localhost ~]# ifconfig
ens33: flags=4163<UP,BROADCAST,RUNNING,MULTICAST>  mtu 1500
        inet 192.168.206.140  netmask 255.255.255.0  broadcast 192.168.206.255
        inet6 fe80::1599:dcc4:b3e8:7fce  prefixlen 64  scopeid 0x20<link>
        ether 00:0c:29:ee:01:80  txqueuelen 1000  (Ethernet)
        RX packets 1804  bytes 145940 (142.5 KiB)
        RX errors 0  dropped 0  overruns 0  frame 0
        TX packets 781  bytes 119581 (116.7 KiB)
        TX errors 0  dropped 0 overruns 0  carrier 0  collisions 0

ens33:0: flags=4163<UP,BROADCAST,RUNNING,MULTICAST>  mtu 1500
        inet 192.168.206.150  netmask 255.255.255.0  broadcast 192.168.206.255
        ether 00:0c:29:ee:01:80  txqueuelen 1000  (Ethernet)

lo: flags=73<UP,LOOPBACK,RUNNING>  mtu 65536
        inet 127.0.0.1  netmask 255.0.0.0
        inet6 ::1  prefixlen 128  scopeid 0x10<host>
        loop  txqueuelen 1000  (Local Loopback)
        RX packets 12  bytes 1056 (1.0 KiB)
        RX errors 0  dropped 0  overruns 0  frame 0
        TX packets 12  bytes 1056 (1.0 KiB)
        TX errors 0  dropped 0 overruns 0  carrier 0  collisions 0
上述操作中,对于网卡 ens33 原来绑定了 ip 地址 192.168.206.140,我们使用 ifconfig add 命令绑定了一个新的 ip :192.168.206.150,现在我们可以使用这个新的 ip 地址来访问原来的网络了。
同理,如果要解绑这个 ip,可以按如下操作:
[root@localhost ~]# ifconfig ens33 del 192.168.206.150
[root@localhost ~]# ifconfig -a
ens33: flags=4163<UP,BROADCAST,RUNNING,MULTICAST>  mtu 1500
        inet 192.168.206.140  netmask 255.255.255.0  broadcast 192.168.206.255
        inet6 fe80::1599:dcc4:b3e8:7fce  prefixlen 64  scopeid 0x20<link>
        ether 00:0c:29:ee:01:80  txqueuelen 1000  (Ethernet)
        RX packets 2127  bytes 172321 (168.2 KiB)
        RX errors 0  dropped 0  overruns 0  frame 0
        TX packets 953  bytes 139954 (136.6 KiB)
        TX errors 0  dropped 0 overruns 0  carrier 0  collisions 0

lo: flags=73<UP,LOOPBACK,RUNNING>  mtu 65536
        inet 127.0.0.1  netmask 255.0.0.0
        inet6 ::1  prefixlen 128  scopeid 0x10<host>
        loop  txqueuelen 1000  (Local Loopback)
        RX packets 18  bytes 1560 (1.5 KiB)
        RX errors 0  dropped 0  overruns 0  frame 0
        TX packets 18  bytes 1560 (1.5 KiB)
        TX errors 0  dropped 0 overruns 0  carrier 0  collisions 0
在 Windows 上与 ifconfig 相对应的命令是 ipconfig,如在 Windows 上查看所有网卡信息可以使用 ipconfig /all。
ping
ping 命令是我们最常用的命令之一,一般用于侦测本机到目标主机的网络是否通畅。其使用方法是:
ping ip地址
使用方法如下:
[root@localhost ~]# ping 120.55.94.78
PING 120.55.94.78 (120.55.94.78) 56(84) bytes of data.
64 bytes from 120.55.94.78: icmp_seq=1 ttl=128 time=11.0 ms
64 bytes from 120.55.94.78: icmp_seq=2 ttl=128 time=17.3 ms
64 bytes from 120.55.94.78: icmp_seq=3 ttl=128 time=16.2 ms
64 bytes from 120.55.94.78: icmp_seq=4 ttl=128 time=10.6 ms
64 bytes from 120.55.94.78: icmp_seq=5 ttl=128 time=10.2 ms
64 bytes from 120.55.94.78: icmp_seq=6 ttl=128 time=18.7 ms
64 bytes from 120.55.94.78: icmp_seq=7 ttl=128 time=15.8 ms
64 bytes from 120.55.94.78: icmp_seq=8 ttl=128 time=10.8 ms
64 bytes from 120.55.94.78: icmp_seq=9 ttl=128 time=10.8 ms
64 bytes from 120.55.94.78: icmp_seq=10 ttl=128 time=11.5 ms
如果目标网络不可达,ping 命令会一直发送而无输出结果,直到我们按 Ctrl + C 中断,才会统计结果。
[root@localhost ~]# ping 120.55.94.79
PING 120.55.94.79 (120.55.94.79) 56(84) bytes of data.
^C^C
--- 120.55.94.79 ping statistics ---
578 packets transmitted, 0 received, 100% packet loss, time 577119ms
Windows 系统上,这种情况下,ping 命令会返回超时的包数量,而不是一直阻塞。且在 Linux 系统上 ping 命令是一直发送数据包,直到人工主动中断;而 Windows 机器上默认会发送 4 个数据包后停止,如果想一直发送而不停止,可以使用 -t 选项。
当然,ping 命令的目标也可以是一个域名,这样通过 ping 这个域名,我们可以得到这个域名解析后的 ip 地址:
[root@localhost ~]# ping www.baidu.com
PING www.a.shifen.com (61.135.169.121) 56(84) bytes of data.
64 bytes from 61.135.169.121 (61.135.169.121): icmp_seq=1 ttl=128 time=30.3 ms
64 bytes from 61.135.169.121 (61.135.169.121): icmp_seq=2 ttl=128 time=28.8 ms
64 bytes from 61.135.169.121 (61.135.169.121): icmp_seq=3 ttl=128 time=29.0 ms
64 bytes from 61.135.169.121 (61.135.169.121): icmp_seq=4 ttl=128 time=31.9 ms
64 bytes from 61.135.169.121 (61.135.169.121): icmp_seq=5 ttl=128 time=28.8 ms
64 bytes from 61.135.169.121 (61.135.169.121): icmp_seq=6 ttl=128 time=27.8 ms
64 bytes from 61.135.169.121 (61.135.169.121): icmp_seq=7 ttl=128 time=29.0 ms
^C
--- www.a.shifen.com ping statistics ---
7 packets transmitted, 7 received, 0% packet loss, time 6011ms
rtt min/avg/max/mdev = 27.822/29.430/31.968/1.244 ms
我们这里得到 www.baidu.com 对应的 ip 地址是 61.135.169.121。
ping 命令是通过发送 ICMP 数据包来实现的。
telnet
telnet 命令是我们最常用的网络调试命令之一。如果你的机器上还没有安装 telnet 命令,可以使用如下命令安装一下:
sudo apt install telnet
如果一个服务程序对外开启了侦听服务,我们都可以使用 telnet ip port 来连接上去,例如:
[root@localhost ~]# telnet 120.55.94.78 8888
Trying 120.55.94.78...
Connected to 120.55.94.78.
Escape character is '^]'.
如果不指定端口号,telnet 会使用默认 23 号端口。
反过来说,可以通过 telnet 命令去检测指定 ip 地址和端口号的侦听服务是否存在。知道这点很重要,我们可以利用这个去检测一个服务是否可以正常连接。举个例子,比如某次从某处得到一个代码下载地址,这是一个 svn 地址:svn://120.55.94.78/mycode/mybook。为了检测这个 svn 服务是否还能正常对外服务,我们可以先用 ping 命令去检测一下到达这个 ip:120.55.94.78 的网络是否畅通:
[root@localhost ~]# ping 120.55.94.78
PING 120.55.94.78 (120.55.94.78) 56(84) bytes of data.
64 bytes from 120.55.94.78: icmp_seq=1 ttl=128 time=15.3 ms
64 bytes from 120.55.94.78: icmp_seq=2 ttl=128 time=14.3 ms
64 bytes from 120.55.94.78: icmp_seq=3 ttl=128 time=16.4 ms
64 bytes from 120.55.94.78: icmp_seq=4 ttl=128 time=16.1 ms
64 bytes from 120.55.94.78: icmp_seq=5 ttl=128 time=15.5 ms
^C
--- 120.55.94.78 ping statistics ---
5 packets transmitted, 5 received, 0% packet loss, time 4007ms
rtt min/avg/max/mdev = 14.343/15.568/16.443/0.723 ms
如果网络畅通,我们再用 telnet 去连接上去,由于 svn 服务器使用的默认端口是 3690,我们执行如下命令:
[root@localhost ~]# telnet 120.55.94.78 3690
Trying 120.55.94.78...
Connected to 120.55.94.78.
Escape character is '^]'.
( success ( 2 2 ( ) ( edit-pipeline svndiff1 absent-entries commit-revprops depth log-revprops atomic-revprops partial-replay ) ) )
如上所示,证明这个 svn 服务是正常开启对外服务的。反之,如果 telnet 命令连不上,说明这个服务不能被外部网络正常连接,我们就没必要去做进一步的尝试了。
同样的道理,对于一个 Web 服务,如 baidu.com,由于我们平常都可以通过 www.baidu.com 去访问百度的页面,Web 服务器默认的端口号是 80,我们使用 telnet www.baidu.com 80 应该也可以连接成功的:
[root@localhost ~]# telnet www.baidu.com 80
Trying 115.239.211.112...
Connected to www.baidu.com.
Escape character is '^]'.
hello
HTTP/1.1 400 Bad Request

Connection closed by foreign host.
我们使用 telnet 命令连接上以后,我们随意发送了一个 hello 消息,由于是非法的 http 请求,被服务器关闭了连接。
telnet 命令不仅可以连接某个服务器,还能与服务器进行交互,这通常用于操作一些接受纯文本数据的服务器程序,如 FTP 服务、邮件服务等等。为了演示如何利用 telnet 命令收发数据,我们这里利用 telnet 命令来模拟给某个邮箱发送一封邮件,发送邮件我们通常使用的是 SMTP 协议,该协议默认使用的端口为 25。
假设我们的发件地址是:amass_toolset@163.com,收件地址是:168062547@qq.com。
其中发件地址是一个 163 邮箱,如果你没有的话可以去申请一个,申请后进入邮箱,在设置页面获得网易邮箱的 smtp 服务的服务器地址:
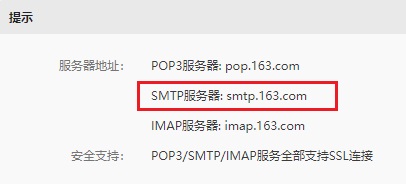
我们得到的地址 smtp 地址是 smtp.163.com,端口号是 25。
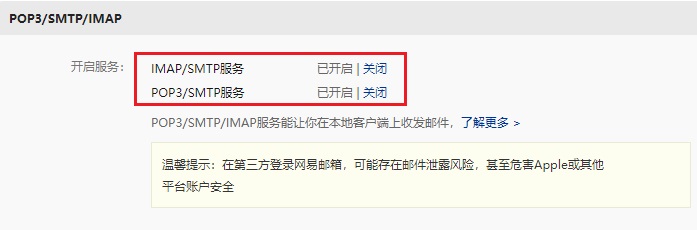
同时,我们��需要开启客户端授权,设置一个客户端授权码:
我们这里将授权码设置为helloword。
早些年很多邮件服务器允许在其他客户端登陆只需要输入正确的邮件服务器地址、用户名和密码就可以了,后来出于安全考虑,很多邮箱采用了授权码机制,在其他第三方客户端登陆该邮箱时需要输入授权码(不是密码),且需要用户主动打开允许第三方客户端登陆的配置选项。
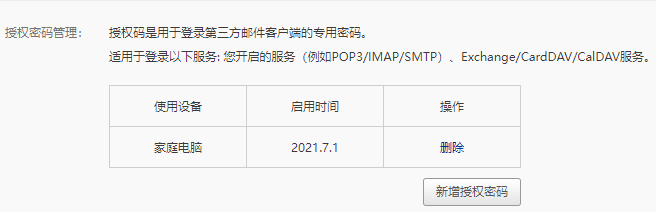
配置完成以后,我们现在就可以利用 telnet 命令连接 163 邮件服务器并发送邮件了,由于在登陆的过程中需要验证用户名和授权码,而且用户名和授权码必须使用 base64 编码之后的,我们先将用户名和授权码的 base64 码准备好,用的时候直接拷贝过去:
| 原文 | base64 码 |
|---|---|
| amass_toolset | YW1hc3NfdG9vbHNldA== |
| helloword | aGVsbG93b3Jk |
在整个演示过程我们一共需要使用如下 SMTP 协议命令:
| 命令 | 含义 |
|---|---|
| helo | 向 smtp 服务器发送问候信息 |
| auth login | 请求登陆验证 |
| data | 请求输入邮件正文 |
SMTP 协议 是文本协议,每一个数据包以 \r\n 结束(Windows 系统下默认换行符)。
我们来看一下演示过程:
[root@localhost ~]# telnet smtp.163.com 25
Trying 220.181.12.14...
Connected to smtp.163.com.
Escape character is '^]'.
220 163.com Anti-spam GT for Coremail System (163com[20141201])
helo 163.com
250 OK
auth login
334 dXNlcm5hbWU6
YW1hc3NfdG9vbHNldA==
334 UGFzc3dvcmQ6
aGVsbG93b3Jk
235 Authentication successful
mail from: <amass_toolset@163.com>
250 Mail OK
rcpt to:  <168062547@qq.com>
250 Mail OK
data
354 End data with <CR><LF>.<CR><LF>
from:amass_toolset@163.com
to: 168062547@qq.com
subject: Test

Hello, this is a message from 163.

.
250 Mail OK queued as smtp10,DsCowADHAgQS1IBcwtExJA--.62308S2 1551946998
Connection closed by foreign host.
[root@localhost ~]#
我们来分析一下上述操作过程:
-
使用
telnet smtp.163.com 25连接 163 邮件服务器;连接成功以后,服务器给我们发送了一条欢迎消息:220 163.com Anti-spam GT for Coremail System (163com[20141201])\r\n -
接着,必须向服务器发送一条问候消息,使用
helo 163.com,当然 163.com 这个是问候内容,可以随意填写,然后回车,最终组成的数据包内容是:helo 163.com\r\n -
接着服务器会回复一条状态码是 250 的消息,这里是:
250 OK\r\n -
我们再输入命令
auth login请求验证,然后按回车,实际发送给服务器的是:auth login\r\n -
服务器应答状态码 334:
334 dXNlcm5hbWU6\r\ndXNlcm5hbWU6是字符串username:的 base64 码。 -
我们输入我们的用户名
amass_toolset的 base64 码,然后按回车:YW1hc3NfdG9vbHNldA==\r\n -
服务器应答状态码 334:
334 UGFzc3dvcmQ6\r\nUGFzc3dvcmQ6是字符串Password:的 base64 码。这里实际上要求我们输入的是上文介绍的授权码,而不是密码。 -
我们输入
aGVsbG93b3Jk,并回车:aGVsbG93b3Jk\r\n服务器提示我们授权成功(应答状态码 235):
235 Authentication successful\r\n -
接着输入邮件的发件地址和收件地址,服务器也会给我们响应的应答(应答状态码 250):
mail from: <amass_toolset@163.com>\r\n
250 Mail OK\r\n
rcpt to:  <168062547@qq.com>\r\n
250 Mail OK\r\n -
接着输入 data 命令设置邮件的主题、正文、对方收到邮件后显示的的发件人信息等:
data\r\n
354 End data with <CR><LF>.<CR><LF>
服务器应答 354,并且提示,如果确定结束输入邮件正文就先按一个回车键,再输入一个点 .,再接着回车,这样邮件就发送出去了。
-
服务器应答 250:
250 Mail OK queued as smtp13,EcCowABnm_zPy7Vhg6x6Bw--.23648S2 1639304268 -
如果我们想退出,输入 quit 或 close 都可以。
最终,这封邮件就发出去了,我们去168062547@qq.com 这个邮箱查看一下:
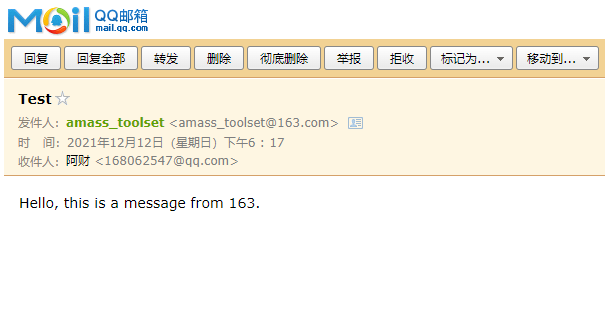
如果你在实际实验时,对端没有收到邮件,请查看下你的垃圾箱或者邮箱反垃圾邮件设置,有可能被邮箱反垃圾邮件机制给拦截了。
上述在组装 SMTP 协议包时涉及到很多状态码,常见的 SMTP 状态码含义如下:
211 帮助返回系统状态
214 帮助信息
220 服务准备就绪
221 关闭连接
235 用户验证成功
250 请求操作就绪
251 用户不在本地,转寄到其他路径
334 等待用户输入验证信息
354 开始邮件输入
421 服务不可用
450 操作未执行,邮箱忙
451 操作中止,本地错误
452 操作未执行,存储空间不足
500 命令不可识别或语言错误
501 参数语法错误
502 命令不支技
503 命令顺序错误
504 命令参数不支持
550 操作未执行,邮箱不可用
551 非本地用户
552 中止存储空间不足
553 操作未执行,邮箱名不正确
554 传输失败
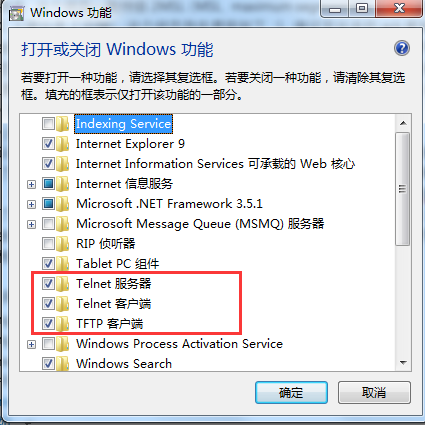
由于我们使用的开发机器以 Windows 居多,默认情况下,Windows 系统的 telnet 命令是没有开启的,我们可以在【控制面板】- 【程序】- 【程序和功能】- 【打开或关闭Windows功能】中打开telnet功能。如下图所示:
netstat
无论是 Windows 和 Linux 都提供了 netstat 命令,这个命令是我们使用的较多的查看网络连接状态的命令。这里以 Linux 系统为例,其常见选项有:
-a (all)显示所有选项,netstat 默认不显示 LISTEN 相关。
-t (tcp)仅显示 tcp 相关选项
-u (udp)仅显示 udp 相关选项
-n 不显示别名,能显示数字的全部转化成数字
-l 仅列出有在 Listen (监听) 的服務状态
-p 显示建立相关链接的程序名
-r 显示路由信息,路由表
-e 显示扩展信息,例如uid等
-s 按各个协议进行统计 (重要)
-c 每隔一个固定时间,执行该 netstat 命令。
我们来详细介绍一下 -n 选项,默认情况下,对于一些有别名的 ip 地址和端口号 netstat 会以其别名来显示,例如 127.0.0.1 会显示成 localhost,80 端口会显示成 http。如下所示:
[root@iZ238vnojlyZ ~]# netstat -at
Active Internet connections (servers and established)
Proto Recv-Q Send-Q Local Address           Foreign Address         State
tcp        0      0 0.0.0.0:svn             0.0.0.0:*               LISTEN
tcp        0      0 0.0.0.0:http            0.0.0.0:*               LISTEN
tcp        0      0 0.0.0.0:ssh             0.0.0.0:*               LISTEN
tcp        0      0 0.0.0.0:ddi-tcp-1       0.0.0.0:*               LISTEN
tcp        0      0 0.0.0.0:italk           0.0.0.0:*               LISTEN
tcp        0      0 0.0.0.0:dnp             0.0.0.0:*               LISTEN
tcp        0      0 localhost:32000         0.0.0.0:*               LISTEN
tcp        0      0 0.0.0.0:commtact-http   0.0.0.0:*               LISTEN
tcp        0    404 iZ238vnojlyZ:ssh        101.224.250.233:57844   ESTABLISHED
tcp        0      0 iZ238vnojlyZ:59520      100.100.45.131:http     ESTABLISHED
tcp        0      0 localhost:32000         localhost:31000         ESTABLISHED
tcp6       0      0 [::]:mysql              [::]:*                  LISTEN
tcp6       0      0 [::]:ftp                [::]:*                  LISTEN
tcp6       0      0 localhost:31000         localhost:32000         ESTABLISHED
我们加上 -n 选项看一下效果:
[root@iZ238vnojlyZ ~]# netstat -atn
Active Internet connections (servers and established)
Proto Recv-Q Send-Q Local Address           Foreign Address         State
tcp        0      0 0.0.0.0:3690            0.0.0.0:*               LISTEN
tcp        0      0 0.0.0.0:80              0.0.0.0:*               LISTEN
tcp        0      0 0.0.0.0:22              0.0.0.0:*               LISTEN
tcp        0      0 0.0.0.0:8888            0.0.0.0:*               LISTEN
tcp        0      0 0.0.0.0:12345           0.0.0.0:*               LISTEN
tcp        0      0 0.0.0.0:20000           0.0.0.0:*               LISTEN
tcp        0      0 127.0.0.1:32000         0.0.0.0:*               LISTEN
tcp        0      0 0.0.0.0:20002           0.0.0.0:*               LISTEN
tcp        0    404 120.55.94.78:22         101.224.250.233:57844   ESTABLISHED
tcp        0      0 10.117.203.175:59520    100.100.45.131:80       ESTABLISHED
tcp       15      0 127.0.0.1:32000         127.0.0.1:31000         ESTABLISHED
tcp6       0      0 :::3306                 :::*                    LISTEN
tcp6       0      0 :::21                   :::*                    LISTEN
tcp6       0      0 127.0.0.1:31000         127.0.0.1:32000         ESTABLISHED
如上所示,所有的 ip 地址和端口号就不再以别名形式显示了。
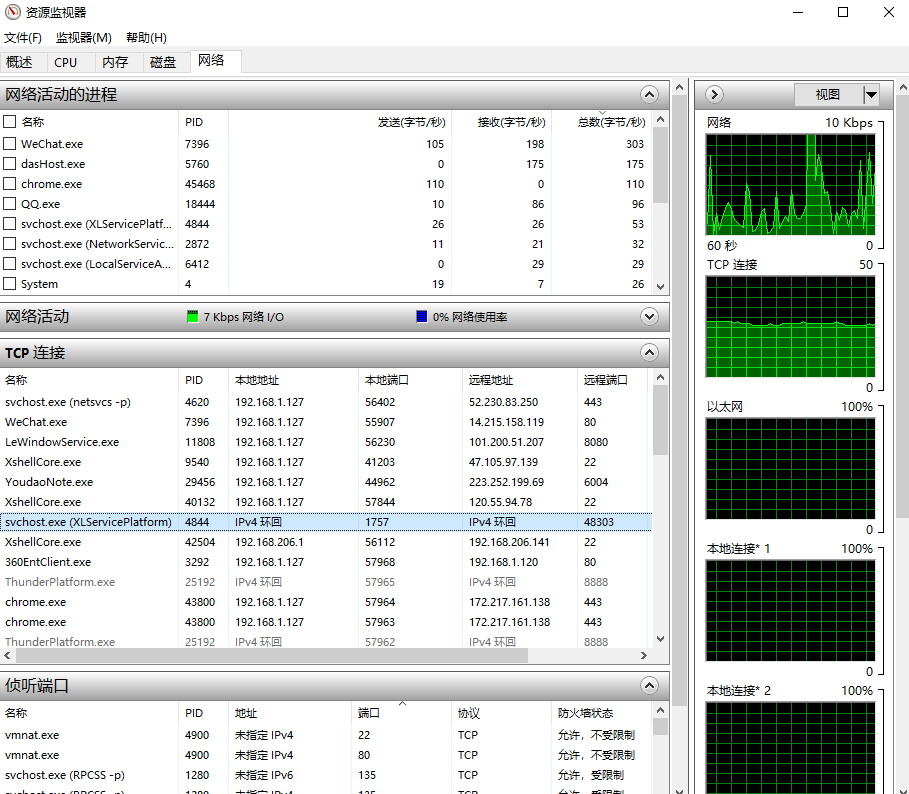
在 Windows 系统上,除了可以使用 netstat 查看网络状态信息以外,还可以通过任务管理器打开资源监视器来查看当前系统各种网络连接状态(以下是 Win10 的截图):
lsof
lsof 命令是 Linux 系统的扩展工具,它的含义是 list opened filedesciptor (列出已经打开的文件描述符),在 Linux 系统中,所有的与资源句柄相关的东西都可以统一抽象成文件描述符(filedescriptor,简称 fd)。一个文件句柄是一个 fd,一个 socket 对象也可以称之为 fd 等等。
默认情况下,系统是不存在这个命令的,你需要安装一下,使用如下命令安装:
sudo apt install lsof
我们来看一下这个命令的使用效果:
amass@AmassPC:~$ sudo lsof
COMMAND    PID TID TASKCMD    USER   FD      TYPE             DEVICE  SIZE/OFF              NODE NAME
init         1                root  cwd       DIR               8,32      4096                 2 /
init         1                root  rtd       DIR               8,32      4096                 2 /
init         1                root  txt       REG               0,22   1392928   562949953577009 /init
init         1                root    0u      CHR                1,3       0t0                 3 /dev/null
init         1                root    1u      CHR                1,3       0t0                 3 /dev/null
init         1                root    2u      CHR                1,3       0t0                 3 /dev/null
init         1                root    3w      CHR               1,11       0t0                 8 /dev/kmsg
init         1                root    4r      REG                0,4         0        4026532241 mnt
init         1                root    5r      REG                0,4         0        4026532365 mnt
init         1                root    6u      DIR               8,32      4096                 2 /
init         1                root    7u     sock                0,7       0t0             17347 protocol: AF_VSOCK
init         1                root    8u  a_inode               0,11         0             17142 [eventpoll]
init         1                root    9u     unix 0x000000009bc2faff       0t0             17349 /run/WSL/1_interop type=SEQPACKET
init         1                root   11u     sock                0,7       0t0             17350 protocol: AF_VSOCK
init         1                root   12r      DIR               8,32      4096             40698 /home/amass
init         1                root   13r      DIR               8,32      4096             40698 /home/amass
init         1                root   14r      DIR               8,32      4096             40698 /home/amass
init         1                root   15r      DIR               8,32      4096             40698 /home/amass
init         1                root  100u     sock                0,7       0t0             19787 protocol: AF_VSOCK
init         1   5 init       root  cwd       DIR               8,32      4096                 2 /
init         1   5 init       root  rtd       DIR               8,32      4096                 2 /
init         1   5 init       root  txt       REG               0,22   1392928   562949953577009 /init
init         1   5 init       root    0u      CHR                1,3       0t0                 3 /dev/null
init         1   5 init       root    1u      CHR                1,3       0t0                 3 /dev/null
init         1   5 init       root    2u      CHR                1,3       0t0                 3 /dev/null
init         1   5 init       root    3w      CHR               1,11       0t0                 8 /dev/kmsg
init         1   5 init       root    4r      REG                0,4         0        4026532241 mnt
结果显示中列出了各个进程打开的各种 fd 类型,对于 Uinx Socket,lsof 命令会显示出其详细的路径,打开的文件 fd 亦是如此。
使用 lsof 命令有三点需要注意:
-
默认情况下,lsof 的输出比较多,我们可以使用 grep 命令过滤我们想要查看的进程打开的 fd 信息,如:
lsof -i | grep node或者使用 lsof -p pid 也能过滤出指定的进程打开的 fd 信息:
amass@AmassPC:~$ lsof -i | grep node
node     91 amass   18u  IPv6   1413      0t0  TCP *:42851 (LISTEN)
node     91 amass   21u  IPv6  17371      0t0  TCP localhost:42851->localhost:37450 (ESTABLISHED)
node    119 amass   18u  IPv4    251      0t0  TCP localhost:37450->localhost:42851 (ESTABLISHED)
node    147 amass   18u  IPv4  17693      0t0  TCP localhost:37456->localhost:42851 (ESTABLISHED)
node 165 amass 19u IPv6 17375 0t0 TCP localhost:42851->localhost:37456 (ESTABLISHED) -
lsof 命令只能查看到当前用户有权限查看到的进程 fd 信息,对于其没有权限的进程,最右边一列会显示 “Permission denied”。如下所示:
sshd      26759          root  cwd   unknown                              /proc/26759/cwd (readlink: Permission denied)
sshd      26759          root  rtd   unknown                              /proc/26759/root (readlink: Permission denied)
sshd      26759          root  txt   unknown                              /proc/26759/exe (readlink: Permission denied)
sshd      26759          root NOFD                                        /proc/26759/fd (opendir: Permission denied)
bash      26761          root  cwd   unknown                              /proc/26761/cwd (readlink: Permission denied)
bash      26761          root  rtd   unknown                              /proc/26761/root (readlink: Permission denied)
bash      26761          root  txt   unknown                              /proc/26761/exe (readlink: Permission denied)
bash 26761 root NOFD /proc/26761/fd (opendir: Permission denied) -
lsof 命令第一栏进程名在显示的时候,默认显示前 n 个字符,这样如果我们需要显示完整的进程名以方便过滤的话,可以使用 +c 选项。用法如下:
#最左侧的程序名最大显示 15 个字符
amass@AmassPC:~$ sudo lsof +c 15
当然,如果你设置值太大, lsof 便不会采用你设置的最大值,而是使用默认最大值。
上文也介绍了,socket 也是一种 fd,如果需要仅显示系统的网络连接信息,使用的是 -i 选项即可,这个选项可以形象地显示出系统当前的出入连接情况:
amass@AmassPC:~$ lsof -i
COMMAND PID  USER   FD   TYPE DEVICE SIZE/OFF NODE NAME
node     91 amass   18u  IPv6   1413      0t0  TCP *:42851 (LISTEN)
node     91 amass   21u  IPv6  17371      0t0  TCP localhost:42851->localhost:37450 (ESTABLISHED)
node    119 amass   18u  IPv4    251      0t0  TCP localhost:37450->localhost:42851 (ESTABLISHED)
node    147 amass   18u  IPv4  17693      0t0  TCP localhost:37456->localhost:42851 (ESTABLISHED)
node    165 amass   19u  IPv6  17375      0t0  TCP localhost:42851->localhost:37456 (ESTABLISHED)
看到图中的连接方向了吧?
当然,和 netstat 命令一样,lsof -i 默认也会显示 ip 地址和端口号的别名,我们只要使用 -n 和 -P 选项就能相对应地显示 ip 地址和端口号了,综合起来就是 lsof -Pni:
amass@AmassPC:~$ lsof -Pni
COMMAND PID  USER   FD   TYPE DEVICE SIZE/OFF NODE NAME
node     91 amass   18u  IPv6   1413      0t0  TCP *:42851 (LISTEN)
node     91 amass   21u  IPv6  17371      0t0  TCP 127.0.0.1:42851->127.0.0.1:37450 (ESTABLISHED)
node    119 amass   18u  IPv4    251      0t0  TCP 127.0.0.1:37450->127.0.0.1:42851 (ESTABLISHED)
node    147 amass   18u  IPv4  17693      0t0  TCP 127.0.0.1:37456->127.0.0.1:42851 (ESTABLISHED)
node    165 amass   19u  IPv6  17375      0t0  TCP 127.0.0.1:42851->127.0.0.1:37456 (ESTABLISHED)
nc
nc 即 netcat 命令,这个工具在排查网络故障时非常有用,功能非常强大,因而被业绩称为网络界的“瑞士军刀”,请读者务必掌握。默认系统是没有这个命令的,你需要安装一下,安装方法:
sudo apt install nc
nc 命令常见的用法是模拟一个服务器程序被其他客户端连接,或者模拟一个客户端连接其他服务器,连接之后就可以进行数据收发。我们来逐一介绍一下:
-
模拟一个服务器程序
使用 -l 选项(单词 listen 的第一个字母)在某个 ip 地址和端口号上开启一个侦听服务,以便让其他客户端连接。通常为了显示更详细的信息,会带上 -v 选项。
示例如下:
[root@iZ238vnojlyZ ~]# nc -v -l 127.0.0.1 6000
Ncat: Version 6.40 ( http://nmap.org/ncat )
Ncat: Listening on 127.0.0.1:6000
这样就在 6000 端口开启了一个侦听服务器,我们可以通过 127.0.0.1:6000 去连接上去;如果你的机器可以被外网访问,你可以使用 0.0.0.0 这样的侦听地址,示例:
[root@iZ238vnojlyZ ~]# nc -v -l 0.0.0.0 -p 6000
Ncat: Version 6.40 ( http://nmap.org/ncat )
Ncat: Listening on 0.0.0.0:6000 -
模拟一个客户端程序
用 nc 命令模拟一个客户端程序时,我们不需要使用 -l 选项,直接写上 ip 地址(或域名,nc 命令可以自动解析域名)和端口号即可,示例如下:
## 连接百度 web 服务器
[root@iZ238vnojlyZ ~]# nc -v www.baidu.com 80
Ncat: Version 6.40 ( http://nmap.org/ncat )
Ncat: Connected to 115.239.211.112:80.
输出提示我们成功连接上百度 Web 服务器。
我们知道客户端连接服务器一般都是操作系统随机分配一个可用的端口号连接到服务器上去,使用 nc 命令作为客户端时可以使用 -p 选项指定使用哪个端口号连接服务器,例如,我们希望通过本地 5555 端口连接百度的 Web 服务器,可以这么输入:
[root@iZ238vnojlyZ ~]# nc -v -p 5555 www.baidu.com 80
Ncat: Version 6.40 ( http://nmap.org/ncat )
Ncat: Connected to 115.239.211.112:80.
再开一个 shell 窗口,我们使用上文中介绍的 lsof 命令验证一下,是否确实通过 5555 端口连接上了百度 Web 服务器。
[root@iZ238vnojlyZ ~]# lsof -Pni | grep nc
nc        32610    root    3u  IPv4 113369437      0t0  TCP 120.55.94.78:5555->115.239.211.112:80 (ESTABLISHED)
结果确实如我们所期望的。
当然,当使用 nc 命令与对端建立连接后,我们可以发送消息。下面通过一个具体的例子来演示一下这个过程
- 使用
nc -v -l 0.0.0.0 6000模拟一个侦听服务,再新建一个 shell 窗口利用nc -v 127.0.0.1 6000模拟一个客户端程序连接刚才的服务器。 - 此时在客户端和服务器就可以相互发消息了。我们可以达到一个简化版的 IM 软件聊天效果:
客户端效果:
amass@AmassPC:~$ nc -v 127.0.0.1 6000
Connection to 127.0.0.1 6000 port [tcp/x11] succeeded!
你好,我是客户端。
你好你好,我是服务器。
服务器端效果:
amass@AmassPC:~$ nc -v -l 0.0.0.0 6000
Listening on AmassPC 6000
Connection received on localhost 33260
你好,我是客户端。
你好你好,我是服务器。
如果你在使用 nc 命令发消息时不小心输入错误,可以使用 Ctrl + Backspace 键删除。
nc 命令默认会将 \n 作为每条消息的结束标志,如果你指定了 -C 选项,将会使用 \r\n 作为消息结束标志。
nc 命令不仅可以发消息,同时也能发文件。我们也来演示一下:
需要注意的是是接收文件的一方是服务器端,发送文件的一方是客户端。
-
服务器端命令:
nc -l ip地址 端口号 > 接收的文件名 -
客户端命令:
nc ip地址 端口号 < 发送的文件名
服务器端效果:
amass@AmassPC:~$ nc -v -l 12345 > source.tar.gz
Listening on AmassPC 12345
Connection received on localhost 39990
客户端效果:
amass@AmassPC:~$ nc 127.0.0.1 12345 < ./lvgl-8.0.2.tar.gz
注意:这里客户端发送一个文件叫 lvgl-8.0.2.tar.gz,服务器端以文件名 source.tar.gz来保存,也就是说服务器端保存接收的文件名时不一定要使用客户端发送的文件名。
amass@AmassPC:~$ ls -l
总用量 360772
    ...部分省略...
-rw-r--r-- 1 amass amass   9916533 11月  6 18:00 lvgl-8.0.2.tar.gz
-rw-r--r-- 1 amass amass   9916533 12月 12 18:40 source.tar.gz
根据上面的介绍,当我们需要调试我们自己的服务器或者客户端程序时,又不想自己开发相应的对端,我们就可以使用 nc 命令去模拟。
当然,nc 命令非常强大,其功能远非本节介绍的这些,读者如果有兴趣可以去 nc 的 man 手册上获取更多的信息。
curl
有读者应该用过图形化的 http 请求模拟工具 PostMan,与 PostMan 一样,curl 命令是 Linux 上可以模拟发送 http 请求的一个非常常用的命令,可以使用如下命令安装:
sudo apt install curl
curl 最基础的用法是 curl 页面url,例如:
curl http://www.baidu.com
其默认行为是把目标页面内容输出到 shell 窗口:
[root@localhost ~]# curl http://www.baidu.com
<!DOCTYPE html>
<!--STATUS OK--><html> <head><meta http-equiv=content-type content=text/html;charset=utf-8><meta http-equiv=X-UA-Compatible content=IE=Edge><meta content=always name=referrer><link rel=stylesheet type=text/css href=http://s1.bdstatic.com/r/www/cache/bdorz/baidu.min.css><title>百度一下,你就知道</title></head> <body link=#0000cc> <div id=wrapper> <div id=head> <div class=head_wrapper> <div class=s_form> <div class=s_form_wrapper> <div id=lg> <img hidefocus=true src=//www.baidu.com/img/bd_logo1.png width=270 height=129> </div> <form id=form name=f action=//www.baidu.com/s class=fm> <input type=hidden name=bdorz_come value=1> <input type=hidden name=ie value=utf-8> <input type=hidden name=f value=8> <input type=hidden name=rsv_bp value=1> <input type=hidden name=rsv_idx value=1> <input type=hidden name=tn value=baidu><span class="bg s_ipt_wr"><input id=kw name=wd class=s_ipt value maxlength=255 autocomplete=off autofocus></span><span class="bg s_btn_wr"><input type=submit id=su value=百度一下 class="bg s_btn"></span> </form> </div> </div> <div id=u1> <a href=http://news.baidu.com name=tj_trnews class=mnav>新闻</a> <a href=http://www.hao123.com name=tj_trhao123 class=mnav>hao123</a> <a href=http://map.baidu.com name=tj_trmap class=mnav>地图</a> <a href=http://v.baidu.com name=tj_trvideo class=mnav>视频</a> <a href=http://tieba.baidu.com name=tj_trtieba class=mnav>贴吧</a> <noscript> <a href=http://www.baidu.com/bdorz/login.gif?login&tpl=mn&u=http%3A%2F%2Fwww.baidu.com%2f%3fbdorz_come%3d1 name=tj_login class=lb>登录</a> </noscript> <script>document.write('<a href="http://www.baidu.com/bdorz/login.gif?login&tpl=mn&u='+ encodeURIComponent(window.location.href+ (window.location.search === "" ? "?" : "&")+ "bdorz_come=1")+ '" name="tj_login" class="lb">登录</a>');</script> <a href=//www.baidu.com/more/ name=tj_briicon class=bri style="display: block;">更多产品</a> </div> </div> </div> <div id=ftCon> <div id=ftConw> <p id=lh> <a href=http://home.baidu.com>关于百度</a> <a href=http://ir.baidu.com>About Baidu</a> </p> <p id=cp>©2017 Baidu <a href=http://www.baidu.com/duty/>使用百度前必读</a> <a href=http://jianyi.baidu.com/ class=cp-feedback>意见反馈</a> 京ICP证030173号 <img src=//www.baidu.com/img/gs.gif> </p> </div> </div> </div> </body> </html>
你也可以把页面保存到本地(等价于 -o 选项),示例:
curl http://www.baidu.com > index.html
## 等价于
curl -o index.html http://www.baidu.com
http 常用的请求方式是 GET 和 POST 两种方式,我们可以使用 -X 选项来显式指定请求是 GET 还是 POST 方式(不指定使用默认 GET 方式):
curl -X GET http://www.baidu.com/index.php?s=9
如果使用 GET 方式,curl 提供了另外一个专门的选项 -G (或 –get)来设置。
如果是 POST 方法,除了需要使用 -X 选项(或 –request)指定请求方法,还需要使用 -d (或 –data)指定 POST 的数据内容:
curl -X POST -d 'somepostdata' 'https://www.somesite.com/api/v1/chat'
我们有时候需要在发送 http 请求时设置增加一些头部信息,可以使用 -H(或 –header)指定,如果有多个选项可以使用多次 -H 来逐一设置。例如:
curl -X POST -H 'Content-Type: application/x-www-form-urlencoded' -H 'Accept: application/json' -H 'X-Requested-With: XMLHttpRequest' -d 'somepostdata' 'https://www.somesite.com/api/v1/chat'
当然,对于一些常用的 http 头字段,curl 提供了单独的选项:例如 user-agent 字段可以使用 -A 选项(或 –user-agent)设置;referer 字段可以使用 -e 选项(或 –referer)设置;等等。
如果你希望 http 的应答结果中包含 http 头部信息,可以使用 -i 选项(或 –include),演示如下:
[root@localhost ~]# curl -i http://www.baidu.com/
HTTP/1.1 200 OK
Accept-Ranges: bytes
Cache-Control: private, no-cache, no-store, proxy-revalidate, no-transform
Connection: Keep-Alive
Content-Length: 2381
Content-Type: text/html
Date: Sat, 09 Mar 2019 06:47:15 GMT
Etag: "588604c4-94d"
Last-Modified: Mon, 23 Jan 2017 13:27:32 GMT
Pragma: no-cache
Server: bfe/1.0.8.18
Set-Cookie: BDORZ=27315; max-age=86400; domain=.baidu.com; path=/
<!DOCTYPE html>
<!--STATUS OK--><html> <head><meta http-equiv=content-type content=text/html;charset=utf-8><meta http-equiv=X-UA-Compatible content=IE=Edge><meta content=always name=referrer><link rel=stylesheet type=text/css href=http://s1.bdstatic.com/r/www/cache/bdorz/baidu.min.css><title>百度一下,你就知道</title></head> <body link=#0000cc> <div id=wrapper> <div id=head> <div class=head_wrapper> <div class=s_form> <div class=s_form_wrapper> <div id=lg> <img hidefocus=true src=//www.baidu.com/img/bd_logo1.png width=270 height=129> </div> <form id=form name=f action=//www.baidu.com/s class=fm> <input type=hidden name=bdorz_come value=1> <input type=hidden name=ie value=utf-8> <input type=hidden name=f value=8> <input type=hidden name=rsv_bp value=1> <input type=hidden name=rsv_idx value=1> <input type=hidden name=tn value=baidu><span class="bg s_ipt_wr"><input id=kw name=wd class=s_ipt value maxlength=255 autocomplete=off autofocus></span><span class="bg s_btn_wr"><input type=submit id=su value=百度一下 class="bg s_btn"></span> </form> </div> </div> <div id=u1> <a href=http://news.baidu.com name=tj_trnews class=mnav>新闻</a> <a href=http://www.hao123.com name=tj_trhao123 class=mnav>hao123</a> <a href=http://map.baidu.com name=tj_trmap class=mnav>地图</a> <a href=http://v.baidu.com name=tj_trvideo class=mnav>视频</a> <a href=http://tieba.baidu.com name=tj_trtieba class=mnav>贴吧</a> <noscript> <a href=http://www.baidu.com/bdorz/login.gif?login&tpl=mn&u=http%3A%2F%2Fwww.baidu.com%2f%3fbdorz_come%3d1 name=tj_login class=lb>登录</a> </noscript> <script>document.write('<a href="http://www.baidu.com/bdorz/login.gif?login&tpl=mn&u='+ encodeURIComponent(window.location.href+ (window.location.search === "" ? "?" : "&")+ "bdorz_come=1")+ '" name="tj_login" class="lb">登录</a>');</script> <a href=//www.baidu.com/more/ name=tj_briicon class=bri style="display: block;">更多产品</a> </div> </div> </div> <div id=ftCon> <div id=ftConw> <p id=lh> <a href=http://home.baidu.com>关于百度</a> <a href=http://ir.baidu.com>About Baidu</a> </p> <p id=cp>©2017 Baidu <a href=http://www.baidu.com/duty/>使用百度前必读</a> <a href=http://jianyi.baidu.com/ class=cp-feedback>意见反馈</a> 京ICP证030173号 <img src=//www.baidu.com/img/gs.gif> </p> </div> </div> </div> </body> </html>
在有些情况下,如果只想显示 http 应答的头部信息(不是 html 文档头部 )可以使用 -I 选项(或 –head),演示如下:
[root@localhost ~]# curl -I http://www.baidu.com/
HTTP/1.1 200 OK
Accept-Ranges: bytes
Cache-Control: private, no-cache, no-store, proxy-revalidate, no-transform
Connection: Keep-Alive
Content-Length: 277
Content-Type: text/html
Date: Sat, 09 Mar 2019 06:42:16 GMT
Etag: "575e1f8a-115"
Last-Modified: Mon, 13 Jun 2016 02:50:50 GMT
Pragma: no-cache
Server: bfe/1.0.8.18
注意:上述输出结果中,13 行的空行是刻意保留的,http 协议的头部每一行以 \r\n 结束,整个头部再以一个 额外的 \r\n 结束,所以正好末尾是有个空行。
如果你需要使用代理去发送 http 请求可以使用 -x 选项(或 –proxy),使用形式如下:
curl -x <[protocol://][user:password@]proxyhost[:port]>
上面介绍的 curl 选项有点多,读者不必刻意记住每个选项,只需要记住常用的即可,其他的实际需要时去 man 手册查看帮助即可。
tcpdump
tcpdump 是 Linux 系统提供的一个非常强大的抓包工具,熟练使用它,对我们排查网络问题非常有用。如果你的机器上还没有安装,可以使用如下命令安装:
sudo apt install tcpdump
如果要使用 tcpdump 命令必须具有 sudo 权限。
tcpdump 常用的选项有:
-
-i 指定要捕获的目标网卡名,网卡名可以使用前面章节中介绍的 ifconfig 命令获得;如果要抓所有网卡的上的包,可以使用 any 关键字。
## 抓取网卡ens33上的包
tcpdump -i ens33
## 抓取所有网卡上的包
tcpdump -i any -
-X 以 ASCII 和十六进制的形式输出捕获的数据包内容,减去链路层的包头信息;-XX 以 ASCII 和十六进制的形式输出捕获的数据包内容,包括链路层的包头信息。
-
-n 不要将 ip 地址显示成别名的形式;-nn 不要将 ip 地址和端口以别名的形式显示。
-
-S 以绝对值显示包的 ISN 号(包序列号),默认以上一包的偏移量显示。
-
-vv 抓包的信息详细地显示;-vvv 抓包的信息更详细地显示。
-
-w 将抓取的包的原始信息(不解析,也不输出)写入文件中,后跟文件名:
tcpdump -i any -w filename -
-r 从利用 -w 选项保存的包文件中读取数据包信息。
除了可以使用选项以外,tcpdump 还支持各种数据包过滤的表达式,常见的形式如下:
## 仅显示经过端口 8888 上的数据包(包括tcp:8888和udp:8888)
tcpdump -i any 'port 8888'

## 仅显示经过端口是 tcp:8888 上的数据包
tcpdump -i any 'tcp port 8888'

## 仅显示源端口是 tcp:8888 的数据包
tcpdump -i any 'tcp src port 8888'

## 仅显示源端口是 tcp:8888 或目标端口是 udp:9999 的包
tcpdump -i any 'tcp src port 8888 or udp dst port 9999'

## 仅显示源地址是127.0.0.1 且源端口是 tcp:9999 的包 ,以 ASCII 和十六进制显示详细输出,
## 不显示 ip 地址和端口号的别名
tcpdump -i any 'src host 127.0.0.1 and tcp src port 9999' -XX -nn -vv
下面我们通过三个具体的操作实例来演示一下使用 tcpdump 的抓包过程。
-
实例一 :连接一个正常的侦听端口
假设我的服务器端的地址是
127.0.0.0.1:12345,使用nc命令在一个 shell 窗口创建一个服务器程序并在这个地址上进行侦听。nc -v -l 127.0.0.1 12345效果如下图所示:
amass@AmassPC:~$ nc -v -l 127.0.0.1 12345
Listening on localhost 12345
在另外一个 shell 窗口开启 tcpdump 抓包:
tcpdump -i any 'port 12345' -XX -nn -vv效果如下:
amass@AmassPC:~$ sudo tcpdump -i any 'port 12345' -XX -nn -vv
tcpdump: listening on any, link-type LINUX_SLL (Linux cooked v1), capture size 262144 bytes
然后再开一个 shell 窗口,利用 nc 命令创建一个客户端去连接服务器:
nc -v 127.0.0.1 12345效果如下:
amass@AmassPC:~$ nc -v 127.0.0.1 12345
Connection to 127.0.0.1 12345 port [tcp/*] succeeded!
我们抓到的包如下:
18:53:43.613527 IP (tos 0x0, ttl 64, id 26582, offset 0, flags [DF], proto TCP (6), length 60)
    127.0.0.1.39996 > 127.0.0.1.12345: Flags [S], cksum 0xfe30 (incorrect -> 0x5c2a), seq 3495112463, win 65495, options [mss 65495,sackOK,TS val 1938076794 ecr 0,nop,wscale 7], length 0
        0x0000:  0000 0304 0006 0000 0000 0000 0000 0800  ................
        0x0010:  4500 003c 67d6 4000 4006 d4e3 7f00 0001  E..<g.@.@.......
        0x0020:  7f00 0001 9c3c 3039 d053 2f0f 0000 0000  .....<09.S/.....
        0x0030:  a002 ffd7 fe30 0000 0204 ffd7 0402 080a  .....0..........
        0x0040:  7384 b47a 0000 0000 0103 0307            s..z........
18:53:43.613536 IP (tos 0x0, ttl 64, id 0, offset 0, flags [DF], proto TCP (6), length 60)
    127.0.0.1.12345 > 127.0.0.1.39996: Flags [S.], cksum 0xfe30 (incorrect -> 0x3d18), seq 2626312835, ack 3495112464, win 65483, options [mss 65495,sackOK,TS val 1938076794 ecr 1938076794,nop,wscale 7], length 0
        0x0000:  0000 0304 0006 0000 0000 0000 0000 0800  ................
        0x0010:  4500 003c 0000 4000 4006 3cba 7f00 0001  E..<..@.@.<.....
        0x0020:  7f00 0001 3039 9c3c 9c8a 5a83 d053 2f10  ....09.<..Z..S/.
        0x0030:  a012 ffcb fe30 0000 0204 ffd7 0402 080a  .....0..........
        0x0040:  7384 b47a 7384 b47a 0103 0307            s..zs..z....
18:53:43.613541 IP (tos 0x0, ttl 64, id 26583, offset 0, flags [DF], proto TCP (6), length 52)
    127.0.0.1.39996 > 127.0.0.1.12345: Flags [.], cksum 0xfe28 (incorrect -> 0x63d4), seq 1, ack 1, win 512, options [nop,nop,TS val 1938076794 ecr 1938076794], length 0
        0x0000:  0000 0304 0006 0000 0000 0000 0000 0800  ................
        0x0010:  4500 0034 67d7 4000 4006 d4ea 7f00 0001  E..4g.@.@.......
        0x0020:  7f00 0001 9c3c 3039 d053 2f10 9c8a 5a84  .....<09.S/...Z.
        0x0030:  8010 0200 fe28 0000 0101 080a 7384 b47a  .....(......s..z
        0x0040:  7384 b47a                                s..z
由于我们没有在客户端和服务器之间发送任何消息,其实抓到的包就是 TCP 连接的三次握手数据包,分析如下:
三次握手过程是客户端先给服务器发送一个 SYN,然后服务器应答一个 SYN + ACK,应答的序列号是递增 1 的,表示应答哪个请求,即从
3495112463递增到3495112464,接着客户端再应答一个 ACK。这个时候,我们发现发包序列号和应答序列号都变成 1了,这是 tcpdump 使用相对序号,我们加上 -S 选项后就变成绝对序列号了。我们按 Ctrl + C 中断 tcpdump 抓包过程,并停止用 nc 开启的客户端和服务器程序,然后在前面的 tcpdump 命令后面加上 -S 选项重新开启抓包,使用命令如下:
tcpdump -i any 'port 12345' -XX -nn -vv -S然后再按顺序用 nc 命令再次启动下服务器和客户端程序。再次得到抓包结果:
amass@AmassPC:~$ sudo tcpdump -i any 'port 12345' -XX -nn -vv -S
tcpdump: listening on any, link-type LINUX_SLL (Linux cooked v1), capture size 262144 bytes
18:58:11.795648 IP (tos 0x0, ttl 64, id 17233, offset 0, flags [DF], proto TCP (6), length 60)
    127.0.0.1.40000 > 127.0.0.1.12345: Flags [S], cksum 0xfe30 (incorrect -> 0x9f91), seq 2928801227, win 65495, options [mss 65495,sackOK,TS val 1938344976 ecr 0,nop,wscale 7], length 0
        0x0000:  0000 0304 0006 0000 0000 0000 0000 0800  ................
        0x0010:  4500 003c 4351 4000 4006 f968 7f00 0001  E..<CQ@.@..h....
        0x0020:  7f00 0001 9c40 3039 ae91 f5cb 0000 0000  .....@09........
        0x0030:  a002 ffd7 fe30 0000 0204 ffd7 0402 080a  .....0..........
        0x0040:  7388 cc10 0000 0000 0103 0307            s...........
18:58:11.795657 IP (tos 0x0, ttl 64, id 0, offset 0, flags [DF], proto TCP (6), length 60)
    127.0.0.1.12345 > 127.0.0.1.40000: Flags [S.], cksum 0xfe30 (incorrect -> 0xe5e1), seq 2901200164, ack 2928801228, win 65483, options [mss 65495,sackOK,TS val 1938344976 ecr 1938344976,nop,wscale 7], length 0
        0x0000:  0000 0304 0006 0000 0000 0000 0000 0800  ................
        0x0010:  4500 003c 0000 4000 4006 3cba 7f00 0001  E..<..@.@.<.....
        0x0020:  7f00 0001 3039 9c40 acec cd24 ae91 f5cc  ....09.@...$....
        0x0030:  a012 ffcb fe30 0000 0204 ffd7 0402 080a  .....0..........
        0x0040:  7388 cc10 7388 cc10 0103 0307            s...s.......
18:58:11.795662 IP (tos 0x0, ttl 64, id 17234, offset 0, flags [DF], proto TCP (6), length 52)
    127.0.0.1.40000 > 127.0.0.1.12345: Flags [.], cksum 0xfe28 (incorrect -> 0x0c9e), seq 2928801228, ack 2901200165, win 512, options [nop,nop,TS val 1938344976 ecr 1938344976], length 0
        0x0000:  0000 0304 0006 0000 0000 0000 0000 0800  ................
        0x0010:  4500 0034 4352 4000 4006 f96f 7f00 0001  E..4CR@.@..o....
        0x0020:  7f00 0001 9c40 3039 ae91 f5cc acec cd25  .....@09.......%
        0x0030:  8010 0200 fe28 0000 0101 080a 7388 cc10  .....(......s...
        0x0040:  7388 cc10                                s...
这次得到的包的序号就是绝对序号了。
-
实例二:连接一个不存在的侦听端口
实例一演示的是正常的 TCP 连接三次握手过程捕获到的数据包。假如我们连接的服务器 ip 地址存在,但监听端口号不存在,我们看下 tcpdump 抓包结果。除了在一个 shell 窗口启动一个 tcpdump 抓包监测,在另外一个 shell 窗口用 nc 命令去连接一个不存在的侦听端口即可。
amass@AmassPC:~$ nc -v 127.0.0.1 12345
nc: connect to 127.0.0.1 port 12345 (tcp) failed: Connection refused
抓包数据如下:
amass@AmassPC:~$ sudo tcpdump -i any 'port 12345' -XX -nn -vv -S
tcpdump: listening on any, link-type LINUX_SLL (Linux cooked v1), capture size 262144 bytes
19:01:22.148738 IP (tos 0x0, ttl 64, id 39526, offset 0, flags [DF], proto TCP (6), length 60)
    127.0.0.1.40004 > 127.0.0.1.12345: Flags [S], cksum 0xfe30 (incorrect -> 0x642f), seq 649646447, win 65495, options [mss 65495,sackOK,TS val 1938535329 ecr 0,nop,wscale 7], length 0
        0x0000:  0000 0304 0006 0000 0000 0000 0000 0800  ................
        0x0010:  4500 003c 9a66 4000 4006 a253 7f00 0001  E..<.f@.@..S....
        0x0020:  7f00 0001 9c44 3039 26b8 d16f 0000 0000  .....D09&..o....
        0x0030:  a002 ffd7 fe30 0000 0204 ffd7 0402 080a  .....0..........
        0x0040:  738b b3a1 0000 0000 0103 0307            s...........
19:01:22.148746 IP (tos 0x0, ttl 64, id 0, offset 0, flags [DF], proto TCP (6), length 40)
    127.0.0.1.12345 > 127.0.0.1.40004: Flags [R.], cksum 0xed27 (correct), seq 0, ack 649646448, win 0, length 0
        0x0000:  0000 0304 0006 0000 0000 0000 0000 0800  ................
        0x0010:  4500 0028 0000 4000 4006 3cce 7f00 0001  E..(..@.@.<.....
        0x0020:  7f00 0001 3039 9c44 0000 0000 26b8 d170  ....09.D....&..p
        0x0030:  5014 0000 ed27 0000                      P....'..
这个时候客户端发送 SYN,服务器应答 ACK+RST,这个应答包会导致客户端的 connect 连接失败返回。
-
实例三:连接一个很遥远的 ip,或者网络繁忙的情形
实际情形中,还存在一种情况就是客户端访问一个很遥远的 ip,或者网络繁忙,服务器对客户端发送的 TCP 三次握手的网络 SYN 报文没有应答,会出现什么情况呢?
我们通过设置防火墙规则来模拟一下这种情况。使用 iptables -F 先将防火墙的已有规则都清理掉,然后给防火墙的 INPUT 链上增加一个规则:丢弃本地网卡 lo(也就是 127.0.0.1 这个回环地址)上的所有 SYN 包。
iptables -F
iptables -I INPUT -p tcp --syn -i lo -j DROP
amass@AmassPC:~$ ifconfig
eth0: flags=4163<UP,BROADCAST,RUNNING,MULTICAST> mtu 1500
inet 172.19.26.112 netmask 255.255.240.0 broadcast 172.19.31.255
inet6 fe80::215:5dff:fe48:90f6 prefixlen 64 scopeid 0x20<link>
ether 00:15:5d:48:90:f6 txqueuelen 1000 (以太网)
RX packets 1012 bytes 360757 (360.7 KB)
RX errors 0 dropped 0 overruns 0 frame 0
TX packets 740 bytes 112533 (112.5 KB)
TX errors 0 dropped 0 overruns 0 carrier 0 collisions 0
lo: flags=73<UP,LOOPBACK,RUNNING> mtu 65536
inet 127.0.0.1 netmask 255.0.0.0
inet6 ::1 prefixlen 128 scopeid 0x10<host>
loop txqueuelen 1000 (本地环回)
RX packets 11058 bytes 41900709 (41.9 MB)
RX errors 0 dropped 0 overruns 0 frame 0
TX packets 11058 bytes 41900709 (41.9 MB)
TX errors 0 dropped 0 overruns 0 carrier 0 collisions 0在开启 tcpdump 抓包之后和设置防火墙规则之后,利用 nc 命令去连接
127.0.0.1:12345这个地址,设置超时时间为60秒。整个过程操作效果图如下:amass@AmassPC:~$ sudo iptables -F
amass@AmassPC:~$ sudo iptables -I INPUT -p tcp --syn -i lo -j DROP
amass@AmassPC:~$ nc -v 127.0.0.1 12345 -w 60
nc: connect to 127.0.0.1 port 12345 (tcp) timed out: Operation now in progress接着,我们得到 tcpdump 抓到的数据包如下:
amass@AmassPC:~$ sudo tcpdump -i any 'port 12345' -XX -nn -vv -S
tcpdump: listening on any, link-type LINUX_SLL (Linux cooked v1), capture size 262144 bytes
19:09:49.837884 IP (tos 0x0, ttl 64, id 26119, offset 0, flags [DF], proto TCP (6), length 60)
    127.0.0.1.40010 > 127.0.0.1.12345: Flags [S], cksum 0xfe30 (incorrect -> 0x8550), seq 3019858896, win 65495, options [mss 65495,sackOK,TS val 1939043018 ecr 0,nop,wscale 7], length 0
        0x0000:  0000 0304 0006 0000 0000 0000 0000 0800  ................
        0x0010:  4500 003c 6607 4000 4006 d6b2 7f00 0001  E..<f.@.@.......
        0x0020:  7f00 0001 9c4a 3039 b3ff 63d0 0000 0000  .....J09..c.....
        0x0030:  a002 ffd7 fe30 0000 0204 ffd7 0402 080a  .....0..........
        0x0040:  7393 72ca 0000 0000 0103 0307            s.r.........
19:09:50.861381 IP (tos 0x0, ttl 64, id 26120, offset 0, flags [DF], proto TCP (6), length 60)
    127.0.0.1.40010 > 127.0.0.1.12345: Flags [S], cksum 0xfe30 (incorrect -> 0x8150), seq 3019858896, win 65495, options [mss 65495,sackOK,TS val 1939044042 ecr 0,nop,wscale 7], length 0
        0x0000:  0000 0304 0006 0000 0000 0000 0000 0800  ................
        0x0010:  4500 003c 6608 4000 4006 d6b1 7f00 0001  E..<f.@.@.......
        0x0020:  7f00 0001 9c4a 3039 b3ff 63d0 0000 0000  .....J09..c.....
        0x0030:  a002 ffd7 fe30 0000 0204 ffd7 0402 080a  .....0..........
        0x0040:  7393 76ca 0000 0000 0103 0307            s.v.........
19:09:52.941355 IP (tos 0x0, ttl 64, id 26121, offset 0, flags [DF], proto TCP (6), length 60)
    127.0.0.1.40010 > 127.0.0.1.12345: Flags [S], cksum 0xfe30 (incorrect -> 0x7930), seq 3019858896, win 65495, options [mss 65495,sackOK,TS val 1939046122 ecr 0,nop,wscale 7], length 0
        0x0000:  0000 0304 0006 0000 0000 0000 0000 0800  ................
        0x0010:  4500 003c 6609 4000 4006 d6b0 7f00 0001  E..<f.@.@.......
        0x0020:  7f00 0001 9c4a 3039 b3ff 63d0 0000 0000  .....J09..c.....
        0x0030:  a002 ffd7 fe30 0000 0204 ffd7 0402 080a  .....0..........
        0x0040:  7393 7eea 0000 0000 0103 0307            s.~.........
19:09:57.021588 IP (tos 0x0, ttl 64, id 26122, offset 0, flags [DF], proto TCP (6), length 60)
    127.0.0.1.40010 > 127.0.0.1.12345: Flags [S], cksum 0xfe30 (incorrect -> 0x6940), seq 3019858896, win 65495, options [mss 65495,sackOK,TS val 1939050202 ecr 0,nop,wscale 7], length 0
        0x0000:  0000 0304 0006 0000 0000 0000 0000 0800  ................
        0x0010:  4500 003c 660a 4000 4006 d6af 7f00 0001  E..<f.@.@.......
        0x0020:  7f00 0001 9c4a 3039 b3ff 63d0 0000 0000  .....J09..c.....
        0x0030:  a002 ffd7 fe30 0000 0204 ffd7 0402 080a  .....0..........
        0x0040:  7393 8eda 0000 0000 0103 0307            s...........
19:10:05.501370 IP (tos 0x0, ttl 64, id 26123, offset 0, flags [DF], proto TCP (6), length 60)
    127.0.0.1.40010 > 127.0.0.1.12345: Flags [S], cksum 0xfe30 (incorrect -> 0x4820), seq 3019858896, win 65495, options [mss 65495,sackOK,TS val 1939058682 ecr 0,nop,wscale 7], length 0
        0x0000:  0000 0304 0006 0000 0000 0000 0000 0800  ................
        0x0010:  4500 003c 660b 4000 4006 d6ae 7f00 0001  E..<f.@.@.......
        0x0020:  7f00 0001 9c4a 3039 b3ff 63d0 0000 0000  .....J09..c.....
        0x0030:  a002 ffd7 fe30 0000 0204 ffd7 0402 080a  .....0..........
        0x0040:  7393 affa 0000 0000 0103 0307            s...........
19:10:22.141486 IP (tos 0x0, ttl 64, id 26124, offset 0, flags [DF], proto TCP (6), length 60)
    127.0.0.1.40010 > 127.0.0.1.12345: Flags [S], cksum 0xfe30 (incorrect -> 0x0720), seq 3019858896, win 65495, options [mss 65495,sackOK,TS val 1939075322 ecr 0,nop,wscale 7], length 0
        0x0000:  0000 0304 0006 0000 0000 0000 0000 0800  ................
        0x0010:  4500 003c 660c 4000 4006 d6ad 7f00 0001  E..<f.@.@.......
        0x0020:  7f00 0001 9c4a 3039 b3ff 63d0 0000 0000  .....J09..c.....
        0x0030:  a002 ffd7 fe30 0000 0204 ffd7 0402 080a  .....0..........
        0x0040:  7393 f0fa 0000 0000 0103 0307            s...........
通过抓包数据可以看到:一共重试了 4 次,最后返回超时失败。这个重试次数在
/proc/sys/net/ipv4/tcp_syn_retries内核参数中设置,默认为 6 。TCP 四次挥手与三次握手基本上类似。